

How to Choose Makeup for a Natural Look in 2026
Table of Contents
- Start with Skin Prep for a Flawless Base
- How to Match Foundation to Skin Undertone
- Cream vs Powder Makeup for Natural Look: Which to Pick
- Conceal and Correct Without the Cakey Finish
- Add Subtle Definition with Bronzer and Blush
- Minimalist Makeup Routine Steps for Everyday Wear
- Set Your Look for All-Day Natural Wear
- Conclusion
- Frequently Asked Questions
Last Updated: September 9, 2026
Choosing the right products is only half the battle; the real secret to a natural look lies in how you prepare and apply them. Most makeup mishaps trace back to a rushed or neglected skincare routine. At J5 Beauty & Skincare, we believe that understanding how to choose makeup for natural look results starts with building a canvas your products can adhere to, rather than masking imperfections.
Start with Skin Prep for a Flawless Base
The foundation of any natural makeup routine is skin that is clean, hydrated, and primed. Without proper prep, even the most lightweight foundation will cling to dry patches or slide off oily zones.
Begin by cleansing to remove impurities, then apply a moisturizer suited to your skin type; hydration is the single most important step for achieving a skin-like texture. For those with concerns like acne or sensitivity, choosing a non-comedogenic moisturizer prevents clogged pores while building the barrier your skin needs. A common mistake is skipping sunscreen, but daily SPF is non-negotiable for preventing pigmentation and maintaining an even tone over time (the American Academy of Dermatology).
Finish with a primer targeted to your needs, whether pore blurring for texture or a gripping formula for longevity. This process should take under five minutes, leaving a smooth surface where makeup blends effortlessly and wears evenly.
How to Match Foundation to Skin Undertone
Identifying your skin undertone is the critical step in choosing a foundation that disappears into your skin rather than sitting on top of it. Undertones fall into three categories: warm, cool, and neutral, and they determine whether gold or silver jewelry flatters you more. A quick check of the veins on your wrist offers a reliable clue: greenish veins suggest warm undertones, bluish veins point to cool, and a mix of both indicates neutral.
Warm undertones pair best with golden or yellow-based shades; cool undertones need pink or rosy bases; neutral undertones can wear both. Test a shade by swiping it along your jawline and checking it in natural light, since indoor lighting can distort how a color reads.
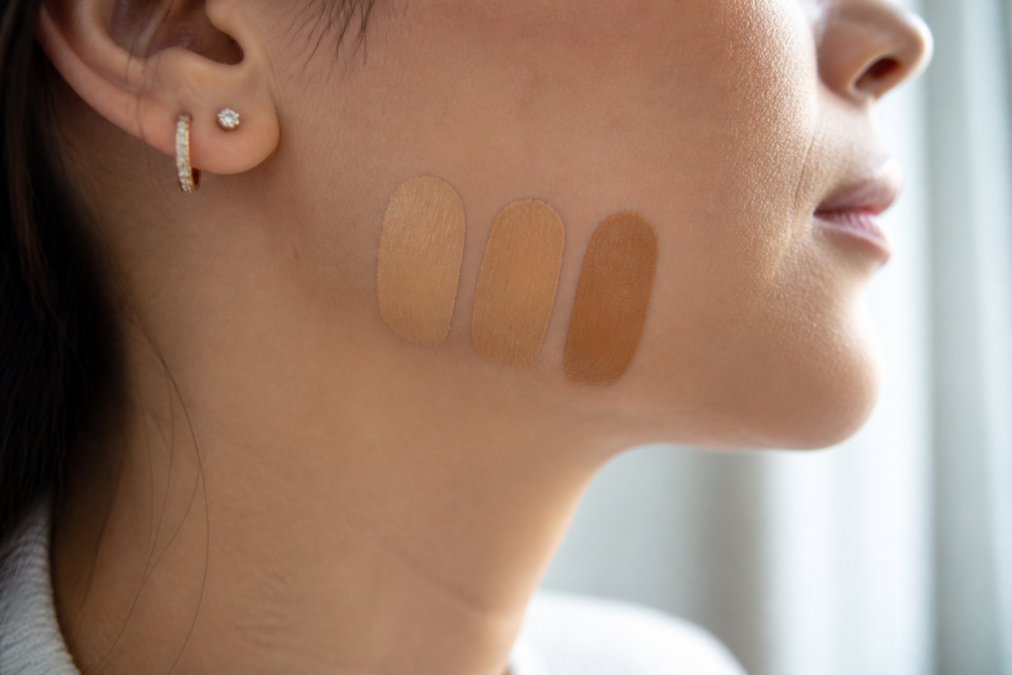
When in doubt, choose a shade slightly lighter rather than darker, as a too-dark base is harder to correct. Your face may differ from your neck; blend until the difference is imperceptible. Many brands now categorize shades by undertone directly on the packaging, simplifying selection.
Cream vs Powder Makeup for Natural Look: Which to Pick
The cream-versus-powder decision is a per-product strategy that depends on your skin's behavior hour by hour, not just your general skin type. The most natural results come from a targeted hybrid approach, not an all-or-nothing formula preference.
The Mechanism: How Each Formula Interacts with Skin
Cream formulas, whether foundations, blushes, or bronzers, are emulsions that deposit pigment within a water or oil base. As they set, they fuse with the skin's natural oils and texture, which is why they read as "skin-like." On oily skin, however, the emollients can break down and migrate into pores or fine lines within four to six hours, especially in the T-zone.
Powder formulas are pigment suspended in a binder (often mica, silica, or talc) that sits on top of the skin. They absorb oil and provide a matte finish, but when applied too heavily, they catch on dry patches or settle into expression lines, reading as makeup rather than skin.
A Decision Framework Beyond Skin Type
Instead of asking "am I dry or oily?" ask "where does my skin produce oil, and where does it feel tight?" Most people are combination: oily in the T-zone and normal-to-dry on the cheeks and jawline. A natural look requires matching the formula to each zone, not the whole face.
- Oily T-zone: Use a powder foundation or a powder bronzer here to control shine. A finely milled silica-based powder (look for "HD" or "blurring" on the label) will absorb oil without looking chalky.
- Dry cheeks and jawline: Use cream blush and cream bronzer here. The emollients will hydrate and blend into the skin's surface, preventing the patchiness that powders cause on dry areas.
- Mature skin (40+): Cream formulas are almost always the better choice across the entire face. Powders settle into the fine lines around the eyes and mouth, accentuating texture that creams smooth over. If you need oil control, use a powder only on the forehead, far from the eye area.
The Blending and Layering Sequence
A common pattern among makeup artists is to layer cream and powder in a specific order to get the benefits of both without the drawbacks:
- Apply cream base (foundation or tinted moisturizer) all over, blending with a damp sponge.
- Press a translucent powder only into the T-zone using a velour puff. The pressing motion locks the cream in place without disturbing the finish.
- Add cream blush and bronzer on the cheeks and cheekbones, blending over the powder-free areas.
- Only if you have very oily skin, dust a powder blush or bronzer over the cream in the same spot to extend wear, this is called "baking" the color in.
The Finish Spectrum: Not Just Dewy vs. Matte
Most guides stop at "dewy vs. matte," but the natural look lives in the middle. Look for products labeled "satin," "natural," or "skin finish," which have a slight sheen that mimics real skin without the high-shine of dewy formulas or the flatness of matte ones. A satin cream foundation paired with a satin powder in the T-zone is the most forgiving combination across all skin types.
When Powder Is the Better Starting Point
If you have very oily skin that breaks down creams within two hours, a powder foundation applied with a damp sponge gives you the coverage of a cream with the longevity of a powder. The damp sponge melts the powder into the skin, reducing the chalky finish.
Conceal and Correct Without the Cakey Finish
The goal of concealing in a natural makeup routine is to reduce imperfections, not erase them under a heavy layer. Spot concealing, applying a small amount only where needed, preserves skin-like texture. Using a shade that matches your foundation prevents the stark patches that signal heavy makeup.
For dark circles, color correction is smarter than piling on a lighter concealer. A peach or salmon corrector neutralizes blue or purple tones before your regular concealer, allowing you to use less product. Pat with your ring finger or a small brush to blend the edges, never rubbing.
The most common cause of a cakey finish is applying too much product too quickly. Build coverage in thin layers, allowing each to set before adding more. If using a cream concealer, set it with a minimal amount of loose powder to lock it in place without dulling radiance.
Add Subtle Definition with Bronzer and Blush
Enhancing your facial features with bronzer and blush should create a healthy flush, not a stripe of color. The placement of these products is what separates a natural look from a made-up one. Smile to find the apples of your cheeks and apply blush there, blending upward toward the temples for a lifted effect.
Bronzer should be applied where the sun naturally hits your face: the forehead, cheekbones, and bridge of the nose. Choose a bronzer that is only one or two shades darker than your skin tone and has a matte or satin finish, as shimmer can look obvious. Cream bronzers and blushes blend seamlessly into a cream base, reinforcing the skin-like texture you have built.
When selecting shades, consider your skin undertones again. Warm undertones glow with peachy or terracotta blushes, while cool undertones are flattered by pink or rose hues. The application technique is equally important: use a stippling brush or your fingers to tap the product on, building intensity gradually rather than applying a heavy swipe that is difficult to diffuse.
Minimalist Makeup Routine Steps for Everyday Wear
A minimalist routine is not just about fewer steps, it is about choosing products that work harder and are less likely to trigger skin issues. For those with sensitive or reactive skin, the "natural look" must also mean a formula that won't cause breakouts, redness, or irritation by midday.
The Ingredient Filter: Non-Comedogenic and Fragrance-Free First
Before buying any product for a minimalist routine, check the label for the non-comedogenic claim and the absence of fragrance. The FDA does not regulate "non-comedogenic," but most dermatologists accept it as an indicator that the formula is less likely to clog pores (the FDA). Avoid pore-clogging ingredients like isopropyl myristate, acetylated lanolin, and high concentrations of dimethicone.
Fragrance, whether synthetic or from essential oils, is the most common cause of contact dermatitis on the face (peer-reviewed research). Even "natural" fragrances like lavender or citrus oils can cause irritation when layered under sunscreen all day. Choose products labeled "fragrance-free" rather than "unscented," as unscented products may still contain masking fragrances.
The Five-Product Ingredient-Conscious Routine
This routine uses five products, each selected for a specific function and skin-safety profile. It takes under eight minutes and minimizes the number of ingredients your skin is exposed to daily.
-
Tinted moisturizer or skin tint with SPF 30+. Look for zinc oxide or titanium dioxide as the active sunscreen ingredient. These physical blockers sit on top of the skin and are less likely to irritate than chemical filters like oxybenzone or avobenzone. Some brands offer zinc-based tints that provide light coverage without clogging pores.
-
Spot concealer with a simple ingredient list. Choose a concealer with fewer than 15 ingredients. A formula with glycerin as a humectant and iron oxides for pigment will blend well without needing heavy emollients. Avoid concealers with added salicylic acid if you are using them over dry patches, as this can cause peeling.
-
Cream blush with a plant-based oil base. Squalane (derived from olives or sugarcane) is a lightweight, non-comedogenic oil that mimics the skin's own sebum. Cream blushes that list squalane or jojoba oil as the second or third ingredient will blend easily and hydrate without clogging pores.
-
Mascara labeled "gentle" or "sensitive." These formulas use fewer film-forming polymers and are less likely to flake into your eyes. Look for a mascara that is ophthalmologist-tested and fragrance-free.
-
Tinted lip balm with SPF. Choose a balm with shea butter or beeswax as the base and a physical sunscreen. This protects the lips without the drying effect of many long-wear lipsticks.
The Patch Test Protocol
Before introducing any new product into your minimalist routine, perform a patch test on your inner forearm for 48 hours. Apply a small amount twice daily and watch for redness, itching, or bumps. This is especially important for tinted moisturizers, which stay on the skin the longest. Reactions often appear within the first 24 hours, but a full 48-hour window is a safe standard.
The "Less Is More" Ingredient Principle
A minimalist routine should also mean minimal ingredient overlap. If your tinted moisturizer contains hyaluronic acid, your concealer does not need it too. Layering the same active ingredient from multiple products increases irritation risk without adding benefit. Read the first five ingredients of each product; if you see the same active in more than two, swap one for a simpler formula.
Set Your Look for All-Day Natural Wear
The final step is locking in your work without sacrificing the dewy, skin-like finish you have created. The right setting strategy depends on your skin type and products used. For dry skin, a hydrating setting spray alone can meld the layers together and extend wear without adding powder.
Oily skin types benefit from targeted setting powder. Instead of dusting across the entire face, press a small amount of translucent powder only into the T-zone, where shine appears first. Using a velour puff to press it in, then brushing away the excess, sets the makeup without a heavy, matte mask.
Setting sprays are the best tool for unifying the look and dissolving powderiness for a more natural glow. Hold the bottle about eight inches from your face and mist in an X and T pattern for even coverage. This helps your makeup survive a long day while maintaining the subtle definition that defines natural makeup.
Conclusion
Mastering how to choose makeup for natural look results is less about rigid rules and more about understanding your skin's unique needs. From matching foundation to your undertone to selecting between cream and powder, each decision builds toward a finish that enhances rather than masks. The minimalist routine and setting techniques here give you a repeatable framework for everyday wear.
Finding the right products from brands you trust is the final piece of the puzzle. J5 Beauty & Skincare offers a curated selection of premium makeup and skincare designed to support your natural beauty goals, with an emphasis on authentic products that deliver real results. Explore our collection to build a routine that gives you the confidence to put your best face forward, naturally.
Frequently Asked Questions
What is the best makeup to achieve a natural look?
The best approach focuses on lightweight formulas that even out your skin tone without masking your complexion. Choose a tinted moisturizer or a lightweight foundation with buildable coverage. Use cream-based products for blush and bronzer to keep the finish dewy and skin-like. Finish with a light dusting of setting powder only in the T-zone to prevent shine while keeping the rest of your face radiant.
How do I choose the right foundation shade for a natural finish?
Test foundation shades on your jawline, not your wrist or hand, to ensure the color blends seamlessly into your neck and face. Check the shade in natural light to see how it looks. Identify your skin undertones first: warm undertones suit foundations with golden or yellow hues, cool undertones pair with pink or blue-based shades, and neutral undertones work with a mix of both.
Should I use cream or powder products for a natural look?
Cream products are the better choice for a natural look if you have dry or normal skin. They melt into the skin for a dewy finish that looks like your own complexion. Powder formulas are helpful for oily skin to control shine and extend wear. For a balanced approach, apply cream blush and bronzer, then use a small amount of translucent setting powder only where you get oily.
What are the essential products for a minimalist makeup routine?
A minimalist routine relies on five core products: a tinted moisturizer or lightweight foundation for even tone, a concealer for spot coverage, a cream blush for color, a brow gel to define your natural shape, and a clear lip balm or tinted gloss. This kit keeps your routine under ten minutes and focuses on enhancing your features rather than adding heavy layers.